Wednesday, September 19, 2012

5 Things that iPhone 5 has to surprise you about

Finally iPhone 5 is out there in our hands, and people are coming up with all of their views and opinion that the much awaited and talked about new gadget has to offer.

The iPhone 5 will surprise you in many ways some of the Top 5 can be the following ways.

The weight
Shaving about an ounce off a phone's heft doesn't sound like a lot, and I've always been skeptical of incremental reductions (20 percent lighter!), but the first thing that shocked me when I picked up the iPhone 5 was how light it was, not how thin it was. There's a reason for this: many smartphones boast large screens and sleek looks, but few weigh as little as 3.95 ounces. Most other iPhones weigh about the same, so it feels different immediately.

The beauty of Maps
Whenever you hear that an app is beautiful to behold, especially an app as integral to the use of the iPhone as Maps, it can't help but feel superfluous. Still, try to look at Maps on an iPhone 5 and not feel wowed. Right now, it's the best graphics demo the iPhone 5 has in its stable, and Flyovers feel intensely surreal, even if you're a Google Earth addict. Whether the graphical finesse of the new Maps and turn-by-turn navigation can make up for the lack of more-refined Google search terms, Street View, and public transit directions feels like a dicey proposition, but Maps is undeniably fun to play with.

The speed
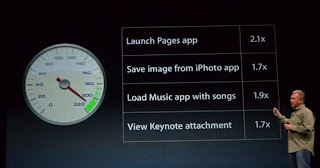
In particular, I'm talking about LTE. I'm not a 4G LTE user at home, and I never thought I'd need it in a phone. Still, the wake-up moment for me was when I opted for FaceTime over LTE instead of Wi-Fi because LTE was more than twice as fast as my home broadband wireless connection, and the connection was smoother. It's a seductive draw: would I end up paying through the nose for LTE for its snappy convenience? I've used it far more than I ever thought I would, at least on the review unit. The A6 processor's harder to appreciate right off the bat, but both combined give this iPhone a serious turbo kick.

Lightning doesn't support Thunderbolt
For years, I've wondered when iOS devices would sync via Apple's incredibly fast Thunderbolt port. A new, smaller connector seemed like the ideal opportunity. Then came the name: Lightning. Lightning and Thunderbolt. Yet, the packed-in Lightning cable works via USB. The door could still be open for Thunderbolt (or USB 3.0) in the future. Does faster syncing matter? To me, it does.

Everything changed just a bit
There's no Big Thing on the iPhone 5, but, try to name a part of the phone that hasn't changed. Usually, iPhones keep at least one or two things intact from one year to the next. This year: design, screen, speakers, microphones, cameras, data connection, even connector port and earphones were toyed with. Instead of investing in one game-changer, the iPhone 5's a top-to-bottom tune-up that makes me wonder, just a little bit, what Apple could do to top it next year.

Tuesday, August 21, 2012

How to remove a spyware

A spyware program generally installs itself on your computer without your consent. This program slows your computer and reduces the system memory. Spyware also infects computer through malicious email attachments or pop-up links(see:How does spyware affect your computer?). To remove a spyware from your computer, follow the manual removal process.

Step1: Uninstall unwanted software from your computer and install spyware detection and removal software.

Step2: You can also remove spyware using Windows Defender.
  • Click Start -> All Programs-> Windows Defender
  • Click the "down arrow" next to Scan and select Full Scan.
  • It will automatically remove any spyware that it detects.

Step3: Delete all temporary files and folders from your computer. And also clean the Recycle Bin.

Step4: If your computer is connected to the Internet then disconnect it and reboot your computer in safe mode.
 
Step5: Scan your computer using the anti-spyware software. It will remove infected programs or files.

Step6: Clean registry where many installed programs store their settings.There will be spyware in the Registry on systems that are infected.You should run the Registry Editor, a program that lets you view and make changes to the Registry.

Step7:  If anti-spyware software cannot remove the spyware, format your hard drive and reinstall your operating system. This should be done only in the worst scenario.

See also: How to Manually Find Spyware on a Mac
                How Adware and Spyware Can Harm Your Computer

Tuesday, August 14, 2012

How to Check if your PC is infected with Conficker Worm

Conficker worm is a computer worm that affects the Windows operating system. A worm is similar to a virus, except that a worm can copy and spread itself without any human interaction. The Conficker worm has the ability to slow your computer and disable certain security software such as virus protection and firewall (see:How to Get Rid of Conficker Worm). Follow the given steps to check if your PC is infected with Conficker worm or not.

Step1: Navigate to the Microsoft website and download the Malicious Software Removal Tool. This is a program that will scan your computer for the presence of viruses or malicious software and remove them.

Step2: If your computer is not up-to-date with the latest security updates, then check the Automatic Update Service. And turn on Automatic update.

  • Click Start, and then click Control Panel.
  • Click Performance and Maintenance, click System, and then click the Automatic Updates tab.
  • Click the option that you want. Make sure Automatic Updates is on.

Step3: You can download free Microsoft Safety Scanner tool that provides on-demand scanning and helps remove viruses, spyware, and other malicious software (How to Fix a Virus-Infected Computer). It works with your existing antivirus software.

Step4: Update antivirus software and run a full virus scan. Delete temporary files from the "Temp" folder. Search the folder for any files that end with the extension ".tmp" and contain a random series of letters and numbers; for example, "fiajdihndnu12142.tmp." Conficker worm files often have these characteristics.

Thursday, August 9, 2012

How to Connect your iPhone to the Internet

Many of your iPhone's features viz. emails, browsing etc. require an Internet connection. Your iPhone has an integrated Wi-Fi capability. When you need Wi-Fi Internet access, you can connect wherever free Wi-Fi access is available. Follow the given steps to connect your iPhone to the Internet.

How to Connect your iPhone to the Internet
Step1: Connect your device to your current Wi-Fi network, tap Settings > Wi-Fi.

Step2: Turn on your Wi-Fi network. It may be necessary to enter a password (Depending on the Wi-Fi network).

Step3: When it is connected to the network, the Wi-Fi icon displays the connection strength.

Step4: Now you will see the correct settings viz. IP-Address, Default gateway, etc.

Step5: You can also disconnect the Internet connection from Settings tab and sliding the Wi-Fi button to OFF.

See also: How to Disable a McAfee Firewall

Tuesday, August 7, 2012

How to Fix a Virus-Infected Computer

A virus- or malware-infected PC can do everything from running slow to putting sensitive information on your computer at risk. Computers can get viruses in several different ways viz. via the Internet or an already infected external device. Follow the given steps to fix your infected computer.

To remove rootkit virus,follow this blog-How to Remove a Rootkit Virus

Step1:  Find the process which is using maximum resources in your computer. Try to delete this process from DOS window. From Start menu->click Run-> Type cmd and press OK.

Step2: Type 'attrib/s -h -s -r 'file name’’ for displaying the attributes of the virus file. Hit Enter after typing the command. Now to delete the virus, type 'del drive name\'file name’.

Step3: For example there is an Autorun.inf virus in your computer that you want to delete. You will type ‘attrib -s -h -r autorun.inf’ and hit Enter. Afterwards, you will type ‘del c:\autorun.inf’.   This command assumes that the virus resides in the C:\ drive. You can change the drive letter accordingly.
 
Step4:  If antivirus is installed your computer then update it first and run a full virus scan on your computer.

Step5: If antivirus is not installed then install one on your computer. Remove unwanted programs from Control  panel.

Step6: If the virus in your computer does not allow you to install the anti-virus, then restart the computer in safe mode.  After successful booting of the system install the antivirus application in safe mode and then restart the computer in normal mode. Run the scanner and check for detection of virus.

See also: How to Avoid Computer Virus Infections
                How To Remove Win HDD virus

Tuesday, July 31, 2012

How to Remove Windows 7 Fix Virus

Windows 7 Fix virus is a fake anti-virus scanning tool made to look like a legitimate Windows program. It displays false information that your computer has a lot of critical problems with hard disks, memory, etc. The virus hides all of your files and folders on your computer.

While Windows 7 Fix is running, it will block legitimate Windows applications on your computer and won’t let you download anything from the Internet. Last, but not least, the rogue will display numerous fake warnings and nag screens. If your PC is infected with this virus, follow the virus removal instructions below:

If you want to remove win HDD virus from windows 7 computer, then follow this blog-How to Remove Win HDD Virus From Windows 7 Computer
 
Step1:  From the Start button, go to the search field and type %allusersprofile%.  Press Enter. It will open contents of the “ProgramData” folder.

Step2:  If the virus has hidden your system files and folders and you want to see them, follow this steps:
Click Organize->select ”Folder and search options”->open View tab-> Select “Show hidden files and folders” option-> uncheck “Hide extensions for known file types”-> uncheck “Hide protected operating files”-> click OK.

Step3:  If file names are displayed with a series of number or letter (e.g. 2636237623.exe or JtwSgJHkjkj.exe), then rename them (right click on it->Rename) with .exe extension.

Step4: Reboot your computer.

Step5: If your desktop is empty then you can set desktop content through: click Start-> type in Search field %UserProfile%\desktop-> hit Enter. It will open all contents of your desktop.

Step6: You can also restart your computer in safe mode. Install any reliable anti-malware software and start scanning your computer to remove Windows 7 Fix infection(see:Free Antivirus Software 2012 Editions).

Wednesday, July 25, 2012

How to Remove a Rootkit Virus

How to Remove a Rootkit Virus
A rootkit virus is a software program that enables attackers to gain administrator access to a system. Some legitimate antivirus programs also use rootkit programs to counteract the actions of hackers. Follow the given steps to remove a rootkit virus manually.

If you want to remove windows virus hunter then follow this blog-How to remove Windows virus hunter

***it is recommended that you back up your system before attempting to delete any rootkits.

Step1: From the "Start" menu, go to “Run" box and type "msconfig". Click "OK".

Step2: Go to the “Boot" tab and check the box “Boot Log".

Step3: Click "Apply" and then restart your computer.

Step4: Search for any files that start with the following names in all the folders and directories and remove them. The file names may be followed by some random alphabets.
  • rot
  • gas
  • gaopdx
  • seneka
  • win32k.sys
  • uacd  
  • tdss
  • kungsf
  •  gxvxc
  • ovsfth
  • msqp
  • ndisp
  • msivx
  • skynet

Step5: Go to My Computer> C:> WINDOWS> system32> drivers and note down the entire path of above mentioned file names. Now open the Command Prompt and disable file permission using CACLS command.

For example, "cacls C:WINDOWSsystem32drivers rot.sys /d everyone" and hit Enter. This will disable the .rot file. Do this for every virus file that you made note of. When done, exit Command Prompt.

Step6: Then restart your computer and search for every file that you made note of and delete them. To delete a file, simply right-click on it and select "Delete". Also clear the all temporary files from your system.

Note: If the infected files are not deleted using manual method, you can run rootkit removal tools and scan your system. To get more help you can take online virus removal support from online.

See also: How to Run Virus Scan in Safe Mode
                How to Detect And Remove a Virus From Your Computer

Tuesday, July 17, 2012

How to remove Windows virus hunter

Windows Virus Hunter is a rogue malicious antivirus program which displays fake security alerts, reporting that malware has been detected on your computer. The rogue program detects false infections and displays numerous fake security warnings, alerts using pop-ups. Windows Virus Hunter disables the Windows system utilities, including Task Manager and Windows Registry and prevents you from running certain programs like antivirus. The browser also redirects you to fake websites when you try to visit security websites and also slows down your computer(see:How to Remove the Google Redirect Virus). Follow the given steps to remove the Windows Virus Hunter.

Step1: Restart your computer and during the restart process, press F8 key on your keyboard repeatedly. Select Safe Mode with Networking, and then press ENTER.
How to remove Windows virus hunter 
Step2:  Windows Virus Hunter adds a proxy to your Internet connection, so we need to its settings. It's because of this proxy, your system display various errors when you try to access the Internet. To do this, open Internet explorer>click Tools >select Internet Options. Then select the "Connections" tab.

Step3: In the "Connections" tab, click LAN settings. Uncheck if the "Use a proxy server for your LAN" box is checked. Click OK.

Step4: Download any latest legitimate anti-spyware software to fully remove Windows Virus Hunter from your computer(see:How to Download Free Virus Removal Software). This software scans your computer and removes the virus.

Step5: After removing Windows Virus Hunter, you will need to reset your Hosts file. It is because this virus modifies your Hosts files due to which you encounter browser redirect problems. To reset the Hosts file, rename the old one. Locate the Hosts file, right-click it and click Rename. Rename it to Hosts.old. Now create a new Hosts file in the same location by right-clicking anywhere on the blank space and selecting New> Text Document.

Step6: A new Notepad file will open up. Make sure that the extension of this file is not .txt. Now copy and paste the text data from Hosts.old to this file. Save the changes and close the file.


Thursday, July 5, 2012

How To Remove Win HDD virus

How To Remove Win HDD virus
Win HDD virus infects your computer by acting like a security application that scans your computer for virus, malware infections. Win HDD is a fraudulent system diagnostic and hard drive defragmenter software which displays fake alerts and system errors on computers affected by it. This virus comes when you download files or software from the Internet. Basically it is a part of a fake system utilities family which includes HDD Diagnostic, HDD Defragmenter and HDD Control. This virus prevents you from accessing the Internet. Follow the given steps to remove virus from your computer.

Step1: First, restart your computer in safe mode. To start your computer in safe mode: Start> click Restart > click OK. As your computer restarts but before Windows loads, press F8 repeatedly. Use the arrow keys to highlight the appropriate safe mode option, and then press ENTER.

Step2: Try to delete the temporary files and then empty the Recycle Bin folder also.

Step3: Clean your Windows registry because it store all of your computer's device and file associations information , as well as critical information about drivers, directories, Windows applications and more. If you are using windows XP, then follow the given points to remove virus from windows registry.
  • Click the Start menu button >Click “Run”.
  • Type "regedit" in the text field and press "Enter."

Step4: Scan your computer using good antivirus tools. To protect your computer from virus, you need a strong and reliable antivirus software.

Note: To get online virus removal support ,you can reach online technical support service desk of V tech-squad at their Toll Free No +1-877-452-9201.

Tuesday, June 26, 2012

How to Remove Achtung Virus

Achtung virus is malicious fake spyware application. If your computer is infected with this virus, you won’t be able to visit any websites but will see some alerts like-Visiting this web site may harm your computer. When your computer is infected with Achtung virus, you get the following symptoms.
  • Achtung virus can slow down your computer.
  • Achtung virus can redirect your default home page to unwanted web sites. Achtung may even add new shortcuts to your PC desktop.
  • Achtung virus shows the popup ads, even when you're not connected to the Internet, while secretly tracking your browsing habits and gathering your personal information.
  • E-mails that you didn't write are being sent from your mailbox
Follow the given steps to remove Achtung virus manually:

Step1: Restart your computer in Safe Mode with Command Prompt (to run Safe mode in your computer, press “F8 key” on your keyboard repeatedly).

Step2: When Windows boots, the Command Prompt will open up showing c:\WINDOWS\system32\cmd.exe. In Command Prompt, type “regedit” and press Enter. Then Registry Editor Window comes up.

Step3: In Registry Editor, find the below entry and select the registry key named Shell. Right click Shell and select Modify.

How to Remove Achtung Virus
HKEY_LOCAL_MACHINE\SOFTWARE\Microsoft\Windows NT\CurrentVersion\Winlogon\

Step4: The default value data is Explorer.exe. Change it to iexplore.exe. Click OK. Close Registry Editor also.

Step5: Now in the Command Prompt window, type “shutdown /r /t 0” and hit the Enter key. Your computer will restart in the normal mode.

Step6: When the computer restarts, you will not see any desktop icons. Now open Windows Task Manager using “Ctrl+Alt+Del” or “Ctrl+Shift+Esc” and run a new task from the File menu-> New Task (Run…).

Remove Achtung VirusStep7: In Create New Task window, type iexplore and click OK. It will open up Internet Explorer.

Step8: After completing the all above steps, scan your computer using a good antivirus. When virus scan completes, remove all the infected items.

Step9: Again open the Windows Task Manager and click File-> New Task (Run…) -> Type in regedit and click OK.

Step10: It will open up Registry Editor again. Find the same above entry (step3), right-click Shell and select Modify .Then Delete iexplore.exe and type Explorer.exe. Click OK.

Step11: Now you can restart your computer to complete the above task.

 If you have any difficulties with manual virus removal instructions, then you can get online virus removal support from online technical support service desk of V tech-squad at their Toll Free No +1-877-452-9201.


Thursday, June 21, 2012

How to Remove the Google Redirect Virus

How to Remove the Google Redirect Virus
Google redirect virus is usually a by-product of malicious software. Many people say that this problem remains after removing the rogue security software or Trojan. This virus redirects your Google search results to unwanted pages when you click the specific website. In some cases anti-virus and anti-spyware programs remove other Trojans or viruses, but unfortunately can’t detect changes made by the Google redirect virus. You should check in order to remove Google Redirect virus or fix Search Engine Redirect problem.

Check Local Area Network (LAN) settings:

•    Open Internet Explorer. In Internet Explorer go to: Tools->Internet Options and click on “Connections” tab, then click “LAN settings” button.
•    Uncheck the checkbox under “Proxy server” and click OK.

Make sure that DNS settings are not changed:

Step1: From “Start” menu, go to Control panel.

Step2: Double-click the “Network Connections” icon to open it. Right-click “Local Area Connection” icon and click “Properties”.

Step3: Select “Internet Protocol (TCP/IP)” and then click the “Properties” button. Choose “Obtain DNS server address automatically” and click OK.

Check Windows HOSTS file:

Step1: Go to: C:\WINDOWS\system32\drivers\etc.

Step2: Double-click the “hosts” file to open it. Choose to open with Notepad.

Step3: The “hosts” file should look the same as in the image below. There should be only one line: 127.0.0.1 localhost in Windows XP and 127.0.0.1 localhost ::1 in Windows Vista. If there are more, then remove them and save changes.

Manage Internet Explorer add-on. Remove unknown or suspicious add-on:

Step1: Open Internet Explorer. In Internet Explorer go to: Tools->Manage Add-ons.

Step2: Uninstall unknown or suspicious Toolbars or Search Engine tools.

Use TDSSKiller tool to remove malware belonging to the family Rootkit.Win32.TDSS

Download the file TDSSKiller.exe and execute the file TDSSKiller.exe.

Scan your computer with legitimate anti-malware software

You should install proper anti-malware software and regularly scan your computer.

Use CCleaner to remove unnecessary system/temp files and browser cache

CCleaner is a freeware system optimization. It’s not a malware removal tool. However, it’s always a good idea to get rid of the unnecessary internet/system files or corrupt Windows registry values that may cause various problems to your computer.

Note: To get online virus removal support ,you can reach online technical support service desk of V tech-squad at their Toll Free No +1-877-452-9201.
 

You can also see: How to Remove a Virus from System Restore
                             How to Run Virus Scan in Safe Mode


Thursday, June 7, 2012

How to Remove a Virus from System Restore

Windows System Restore is a feature that allows you to save a restore point of your computer's system files. This restore point is used to roll back your computer's files when your system file is corrupted or crashed. If a virus has infected your system files, your restore point may be infected with the virus, too. When your system restore is corrupted from virus that time System Restore virus will display many fake pop-ups and fake system scans in order to make people believe it is part of Windows. You can follow the manual process to remove virus by cleaning out your system restore points. Follow the given steps to remove virus from system restore in windows 7.

Step1: From Start button, right click on the "Computer" button and choose "Properties" from the drop-down menu. This will open the Systems Properties window.

Step2: Click the "System Protection" option in the top left hand corner of the window. This will open the System Protection options window.

Step3: Select your computer's hard drive and click the "Configure" button.

Step4: Click the option next to "Turn off system protection" under the Restore Settings .Then click the "OK" button. This will delete any infected system restore points and prevent Windows from making new infected restore points until you have cleaned the virus from your computer.

To turn on System Restore again after the restore point deletion has completed, repeat these steps, but click to clear the Turn off System Restore for all drives check box.

Note: To get online virus removal support ,you can reach online technical support service desk of V tech-squad at their Toll Free No +1-877-452-9201.

Thursday, May 31, 2012

How to Run Virus Scan in Safe Mode

Run Virus Scan in Safe Mode
Safe mode is a diagnostic mode used to trace and solve computer problems that cannot be fixed in the regular booting mode. Booting your computer in safe mode prevents many programs and malicious tools from automatically loading up during startup. Safe mode will allow you to delete a virus successfully because it stops it from running in the background. A powerful virus can easily dodge your antivirus and can prevent its detection when you run a virus scan. It is because the virus is running like any other normal application or process in the background when your computer is in the normal mode.

Suppose your system doesn’t boot up correctly, chances are that it may have a virus. It is recommended that you start your computer in safe mode and run a virus scan. When your computer is the safe mode, it will not load non-essential processes and non-core components. In other words, only the minimum necessary programs will load. Follow the given steps to run virus scan in Safe mode.

Step1: If your computer is on then shut it down and then power it on.

Step2: When power comes on your computer and then repeatedly start pressing the F8 key.

Step3: In the Windows Advanced Options Menu screen, use the Down arrow key to select Safe Mode and press Enter. Once you select Safe Mode, the computer will continue booting up.

Step4: Windows will boot to the logon screen. When logon screen comes up, click "Administrator" and enter your password to log on if you have one. Windows will boot up.

Step5: Click on your antivirus program and open it. Follow the onscreen steps to run a virus scan.

Step6: After the virus scan is completed, delete all detected viruses.

Step7: After completing all the steps, restart your computer in normal mode.


Note: To get online virus removal support ,you can reach online technical support service desk of V tech-squad at their Toll Free No +1-877-452-9201.


Thursday, May 24, 2012

How to Fix McAfee Security Center

fix McAfee Security Center
McAfee Security Center is a security package that includes antivirus and Internet protection suites to protect your computer from every day viruses, trojans, spyware, spam and malware. McAfee programs with time become corrupt from system changes, registry errors and begin to freeze, leaving your computer vulnerable to malicious attacks. Troubleshooting your McAfee Security Center helps fix common problems to ensure that your computer remains protected.

Step1: Any other antivirus programs besides McAfee security center causes conflicts. To uninstall these programs, from Windows "Start" button and click the "Control Panel." Double-click "Add or Remove Programs" to open the programs window. Select programs and click "Remove" to uninstall it from your computer.

Step2: Run a registry cleaner program to fix missing McAfee Security Center dll files and extensions. Mainly most of the errors with McAfee occur in the registry, and repairing the registry will solve a great deal of problems. If you do not have a registry cleaner, download free registry cleaner and install it.

Step3: After install registry cleaner, click the "Registry" button on the left panel. Click "Scan for issues." CCleaner will search the registry for corrupt McAfee files. Then click "Fix selected issues" when the scan is complete and click "Yes" to back up your registry.

Step4: Click on the "Fix all Selected Issues" option when the backup will complete and click "OK" to repair the corrupt McAfee registry entries.

Step5:  Download any available updates, patches and fixes if there are any from the McAfee website. To check for updates, navigate to the McAfee support page and click "Downloads" to see if there are any available security updates.

Step6:  Uninstall and reinstall your McAfee programs as a final resort if all other troubleshooting attempts fail. To uninstall your McAfee programs, click the Windows "Start" button and click the "Control Panel."

Step7: Double click on "Add or Remove Programs" to open the programs window. Scroll through and click the McAfee program you want to uninstall. Click “Remove." Option Perform the same procedure to uninstall other McAfee programs. After completing the all steps, restart your computer.

Step8: Insert your McAfee installation disk into the computer CD-ROM drive to re-install the McAfee programs. If you purchased a download, navigate to the McAfee website to download and install your McAfee programs.

Note: To get McAfee tech support ,you can reach online technical support service desk of V tech-squad at their Toll Free No +1-877-452-9201.

Tuesday, May 22, 2012

How to Get Automatic Adobe Security Updates

Automatic Adobe Security UpdatesUpdate adobe flash player can easily fight the latest threats to your computers. When updates are released, they fix bugs and security threats within the old program, while also adding additional features and functionality. You can choose how often Flash Player updates from the Global Settings Panel. The program provides a message, notifying you whenever there is an updated version. You can set automatic Adobe security update; follow the given points to set automatic update.

  •  Visit the Adobe homepage (See Resources). Scroll down and press the "Flash Platform" icon in the bottom right corner.
  • Click on the "Flash Player" icon which is under the heading "Clients."
  • Press the "Get Support" hyperlink, located below the download link on the right of the page.
  • Click the "Flash Player Settings and Help" hyperlink on the right of the page.
  • Press the "Global Notifications Settings panel" hyperlink on the left side of the page. You have the option of turning on (or off) automatic updates. You can have the program search for updates every seven, 14, 30 and 60 days. You are notified whenever an update is available.
Note:To get technical support ,you can reach online technical support service desk of V tech-squad at their Toll Free No +1-877-452-9201.


Update your Adobe Flash player immediately, as computers are vulnerable even if they have antivirus software

Adobe issued a critical update to its popular Flash player this week. According to Daily Safety Check, users should update their Flash Player immediately to avoid potential cyber attacks, even if they have antivirus software.

(PRWEB) May 18, 2012

Adobe issued a critical update to their popular Flash Player this week. Daily Safety Check, a computer security firm that fixes security weaknesses on home computers, recommends that users update their Flash Player right away.

"This is what is known as a zero day threat, meaning hackers have already been attacking this weakness," according to Jim McKenney, Chief Technology Officer of Daily Safety Check. "Even if users have antivirus installed and up-to-date, hackers can take over your computer just by visiting a legitimate website that has a malicious advertisement."

"Antivirus is a good tool," according to McKenney, "but on its own antivirus software will not protect you from hackers. Hackers are increasingly targeting security weaknesses in applications like Flash and Microsoft Office, that antivirus just can't protect against." Daily Safety Check provides a computer security service for homes and businesses that updates security weaknesses every day, provides hacker monitoring, alerts users in case of an attack. Plus, it includes state-of-the-art antivirus software for about the same price as antivirus software alone."

To interview Jim McKenney or find out more about computer security issues, please contact media(at)dailysafetycheck(dot)com.

About Daily Safety Check
Daily Safety Check is a next generation computer security company, applying layered security principles to home and business computers. The Home Edition includes antivirus software, plus applies daily security fixes, monitors for hackers and alerts you if you are attacked. Visit DailySafetyCheck.com for more information.

For the original version:http://www.prweb.com/releases/prwebDailySafetyCheck/MayFlashUpdate/prweb9521976.htm

Thursday, May 17, 2012

How to Disable a McAfee Firewall

disable a mcafee firewall
The McAfee firewall is included in the McAfee security suite, it block hackers and other external virus. Due to its integrated security features, it can often interfere with the installation of applications and software packages. Some programs may even prompt you to disable the firewall before installation begins. When you install some program it may even prompt you to disable the firewall before installation begins. To disable your McAfee firewall in your system follows the given steps.

Step1: Find the McAfee Security Center taskbar icon. This is located in the lower right-hand side of your screen next to the clock. You may have to click on a small expansion arrow if Windows is set to automatically hide taskbar icons.

Step2: When you have found it, double-click on the icon. It may take a moment to load, but the McAfee Security Center window will come up, displaying multiple configuration options.

Step3: Click on "Configure" on the left side of the screen. If you don't see this option, click "Advanced Menu" at the bottom left to bring up the advanced options. Click on the "Internet & Network" tab, and click the button labeled "Disable Firewall."

If you want to delete Mcafee from your computer,follow this article-How to Delete McAfee From Your Computer.

Note: To get McAfee support ,you can reach online technical support service desk of V tech-squad at their Toll Free No +1-877-452-9201.

Tuesday, May 15, 2012

How to Fix a Redirect Error

fix a redirect error
Trojans and viruses are often the culprit behind website redirects. When your computer has been infected with a virus or Trojan of this sort, every Internet search you conduct is automatically redirected to another undesirable website dictated by the virus or Trojan creator. An antivirus program is needed to fix and get rid of a website redirect error. Windows computers come installed with a program called Windows Defender that scans your computer for harmful files and fixes errors, including redirect errors.

Step1: Close your open web browser.

Step2: Click the Windows orb located in the bottom-left of the screen. The Windows Start menu launches.

Step3: In search box, type Windows Defender from the Start menu and press “Enter.” The Windows Defender program launches.

Step4: Click “Scan” from the top menu and then select “Full Scan.” Windows Defender searches your entire hard drive for the files causing the redirect error. The files are quarantined and automatically removed. This could take several minutes to several hours depending on how many files reside on your system.

Step5: Click the “X” located in the upper-right corner of the Windows Defender tool to close the program after the infecting files have been removed.

Note:To solve any technical related or virus problems in your computer system  then you can reach online technical support service desk of V tech-squad at their Toll Free No +1-877-452-9201.


Thursday, April 26, 2012

How to Temporarily Disable McAfee Virus Protection

temporarily disable mcafee virus protection
The McAfee anti-virus program protects your computer from malicious software which can install itself without your knowledge.Protect from malicious virus you need Mcafee antivirus support. But it can get in the way of legitimate programs you are trying to install, so you may need to temporarily disable it from time to time. Here is a different method of disabling the program depending on whether you are using the stand-alone McAfee virus scan software or you have the entire McAfee Security Center suite.
If you want to delete Mcafee antivirus permanently from your system then follow this article-How to Delete McAfee From Your Computer.

McAfee Anti-Virus:

Step1:  Find the red "M" icon for the McAfee anti-virus program in the expanded system tray and right-click on it.

Step2: And try to look for an option in pop-up menu that says either "Exit" or "Disable" and click on it.

Step3: Click "Yes" when asked if you are sure you want to disable the McAfee anti-virus program. Double-click on the McAfee desktop icon or re-start the computer entirely to enable the program again.

McAfee Security Center:
If you want to change from mcafee security center then follow the given steps:

Step1: Locate the red "M" icon in the system tray at the bottom-right corner of the desktop. Double click on it to open the Security Center program.

Step2: Click on the "Advanced" tab and then choose the option labeled "Configure."

Step3: Click on the "Files" button on the top toolbar. Click on the "Disable" button at the center of the screen.

Step4: Enter in a time for the program to automatically turn back on in the text field at the right or restart the computer to turn McAfee Security Center back on.

If you want to repair Mcafee then follow this article-How to Repair McAfee Antivirus.

Tuesday, April 24, 2012

How to Remove the System Volume Information Virus

remove the system volume information virusWindows uses the System Volume Information to store settings and information about your computer's system configuration. Restore points for your computer saves the windows system restore. System Restore allows you to roll your computer back to a restore point in case of a crash or computer corruption. Sometimes the restore points in the System Volume Information become infected by a virus. To remove this virus from the system volume information, you must delete the infected restore points.Here given list of points will help you to remove the system volume information virus .

Windows 7:
  • From start menu, right click on computer and choose properties. Then it will open the system properties window.
  • Click on the System Protection link in the top left corner. This will launch the System Protection window.
  • Select your computer's main hard drive from the drive select list, then click the "Configure" button.
  • Select the option "Turn off system protection" under Restore Settings and click "OK." This will delete all restore points, including any that have been infected with a virus.
Windows XP:
  • From start menu, right click on computer and choose properties. Then it will open the system properties window.
  • Click on the "System Restore" tab in the properties window.
  • Select the option "Turn off system restore" then click ok
  • Click "Yes" to confirm that you want to turn off System Restore.
  • Allow your computer to change the System Restore setting. This will delete all restore points, including any that have been infected with a virus.
To solve any technical related or virus problems in your computer system  then you can reach online technical support service desk of V tech-squad at their Toll Free No +1-877-452-9201.


Thursday, April 19, 2012

How to Repair PC Security after a Virus Attack

repair pc security after a virus attack
After a virus attack, Windows always gets damaged and with problems involving the registry and/or our folders and documents. Viruses change many different settings on your computer so that the virus can steal information and download additional files to your computer. Repairing your PC’s security after a virus attack needs to be a top priority to prevent further virus attack and infection. Follow the given steps to repair your PC security after a virus attack.

Step1: update antivirus can easily protect virus, so you should update your antivirus software. Just click on the update button on the start page.

Step2: Online virus is most dangerous for your pc. When update is completed then disconnect your computer from internet. You don't want your computer to be infected with another virus through your modem while your security settings are still compromised.

Step3: After updating the software, you should restart your computer and hold down F6 to activate Safe Mode. Scan the system again in Safe Mode.

Step4: Again restart your computer normally and access your security settings through the Control Panel in the Start menu. Click on the Security Center and click on the Firewall to make sure it is enabled.

Step5: after completing the all above steps, then reconnect your system to the internet connection. Try to update your browser, which give better performance and closed the previous security breaches.And try to follow the given points.

  • Avoid Sharing Files via Unsecured Wireless Network
  • Install Good Antivirus on Your PC
  • Always Update Your Antivirus Software
  • Avoid Transferring Data via Strange Removable Disks
  • Avoid Browsing the Internet without Antivirus on Your PC

If you are unable to solve this problem then you can take online virus removal support from technical support company. To get online virus removal support, you can reach  online technical support service desk  from V tech-squad at their Toll Free No +1-877-452-9201.

Wednesday, April 11, 2012

How to Partition Without Losing Data in Windows XP

partition without losing data in windows xp
Partitioning a drive is the process of creating dividers on the drive. You may find that you have to change the partition size to increase or decrease the space on a particular drive. Creating multiple partitions carries the risk of losing data, though Windows XP allows a user to partition without losing data. However, you must have access to the Administrator account for XP before you can attempt it.

Step1: Login to XP under the Administrator account.

Step2: Click the "Start" button on the lower-left side of the screen and select "Run" from the Start menu.

Step3: Type "compmgmt.msc" in the Run window and click "OK." Select the "Disk Management" option.

Step4: Right-click on the unallocated space where you want to create the partition and select the "New Partition" option.

Step5: Click "Next" when the New Partition Wizard appears.

Step6: Choose the "Primary partition" option and click "Next."

Step7: Choose the size of the partition and click "Next." Assign a drive letter and click "Next."

Step8: Choose the "Format this partition with the following settings" option. Select the "NTFS" file system and assign a drive name. Click "Next."

Step9: Look over the options which you already selected and click "Finish" to create the partition.

If you need help managing your hard drive or any technical solution for your pc then you can reach online technical support service desk of V tech-squad at their Toll Free No +1-877-452-9201.

Tuesday, April 3, 2012

How to Fix Microsoft Error Code Stop: c0000135 User32

The Microsoft Windows XP recovery console allows you to easily fix the error Stop: c0000135 User32. This error occurs because of the corrupt user32.dll operating system file. Once this file is replaced with a fresh one from the Windows XP setup CD, the error is rectified. You will need administrator rights to perform this process.Follow the given steps to fix Microsoft error code .

Step1: Insert the Windows XP setup CD in the CD drive of your computer, and then restart your computer.

Step2: Press “R” on your keyboard when you see the Windows XP "Welcome to Setup" screen. This will start the Windows XP recovery console. If you are asked to enter the administrator password, type it and press “Enter.”

Step3: Type the following commands one by one, without quotes, at the command prompt, and then press “Enter.”
“EXPAND drive_letter1:\i386\user32.dll_ drive_letter2\windows\system32”
“EXPAND drive_letter1:\i386\userinit.ex_ drive_letter2\windows\system32”
Replace drive_letter1 here with the CD drive letter of your computer in which the Windows XP setup CD is present (for example, E:), and drive_letter2 here with the letter of the drive in which Windows XP is installed on your computer (for example, D:).

For Microsoft product support you can reach online technical support service desk of V tech-squad at their Toll Free No +1-877-452-9201

Wednesday, March 28, 2012

How to make your browser secure

Every browser has its share of security problems. Make Secure browser is the basic ways to protect your computer from potentially harmful online content or malicious software is easy, fast and free. Try to set your browser's security settings at the appropriate level.

No matter which browser you use, always follow these top five security tips:
  • Delete spam messages without opening them or replying to them.
  •  Use great caution when clicking on links sent to you in e-mail or text messages.
  • Do not open e-mail attachments unless you know the sender and you're expecting the attachment.
  • Create strong passwords. Use different passwords for your online banking accounts.
  • Make sure you use firewall, as well as antivirus and anti spyware software that is automatically updated.
How to check your Internet Explorer security settings:

      1. Open Internet Explorer.
      2. Click the Tools button and then click Internet Options.
      3. Click the Security tab.

You will see four security zones:

Internet: The level of security for the Internet zone is applied to all Web sites by default. The security level for this zone is set to medium-high, but you can change it to either medium or high. The only Web sites for which this security setting is not used are those in the Local Intranet zone, or sites that you specifically entered into the Trusted or Restricted Site zones.

Local Intranet: The level of security for the Local Intranet zone is applied to Web sites and content that is stored on a corporate or business network. The security level for the Local Intranet zone is set to medium, but you can change it to any level.

Trusted Sites: The level of security for Trusted Sites is applied to sites that you have specifically indicated to be ones that you trust not to damage your computer or information. The security level for Trusted Sites is set to medium, but you can change it to any level.

Restricted Sites: The level of security for Restricted Sites is applied to sites that might potentially damage your computer or compromise your personal information. Adding sites to the restricted zone does not block them, but it prevents them from using scripting or any active content. The security level for Restricted Sites is set to high and cannot be changed.

Here is some steps to view or change the security setting on Internet Explorer 7/8:
internet explorer security

 In addition to these default security levels, you can customize individual security settings.

Step1: Open Internet Explorer.

Step2: Click the Tools button and then click Internet Options.

Step3: Click the Security tab.

Step4: Click the "Custom level..." button.

Step5: At the bottom of the pop-up box, you can reset the security setting to something higher or lower. Settings that are not at recommended levels will be highlighted in red.

Step6: If you modify your security settings and want to change them back to the default level, follow the above instructions through step 4. Then click on the "Reset all zones to default level" button.

To solve any technical related problem in your computer system  then you can reach online technical support service desk of V tech-squad at their Toll Free No +1-877-452-9201.

Wednesday, March 21, 2012

Safeguard your data against loss!

To safeguard your data from data loss, you need a secure, reliable, and functional and offsite data protection. Some data is also confidential and you don’t want lose it and also don’t want to give permission to access this file without your permission. Here are some points which will help you to protect your all-important user data from loss and/or unauthorized access.

Back up early and often

The single most important step in protecting your data from loss is to back it up regularly. You can use the backup utility built into Windows (ntbackup.exe) to perform basic backups. You can use Wizard Mode to simplify the process of creating and restoring backups or you can configure the backup settings manually and you can schedule backup jobs to be performed automatically.

Use file-level and share-level security

To keep others out of your data, the first step is to set permissions on the data files and folders. If you have data in network shares, you can set share permissions to control what user accounts can and cannot access the files across the network. With Windows 2000/XP, this is done by clicking the Permissions button on the Sharing tab of the file's or folder's properties sheet.

Password-protect documents

Many productivity applications, such as Microsoft Office applications and Adobe Acrobat, will allow you to set passwords on individual documents. To open the document, you must enter the password. To password-protect a document in Microsoft Word 2003, from tool option you can set password. You can require a password to open the file and/or to make changes to it. You can also set the type of encryption to be used.

Use EFS encryption

There are many third-party products available that will allow you to encrypt an entire disk. Whole disk encryption locks down the entire contents of a disk drive/partition and is transparent to the user. Data is automatically encrypted when it's written to the hard disk and automatically decrypted before being loaded into memory. Some of these programs can create invisible containers inside a partition that act like a hidden disk within a disk. Other users see only the data in the "outer" disk.
Disk encryption products can be used to encrypt removable USB drives, flash drives, etc. Some allow creation of a master password along with secondary passwords with lower rights you can give to other users.

Make use of a public key infrastructure

A public key infrastructure (PKI) is a system for managing public/private key pairs and digital certificates. Because keys and certificates are issued by a trusted third party, certificate-based security is stronger.

Hide data with steganography

You can use a steganography program to hide data inside other data. For example, you could hide a text message within a .JPG graphics file or an MP3 music file, or even inside another text file .Steganography does not encrypt the message, so it's often used in conjunction with encryption software. The data is encrypted first and then hidden inside another file with the steganography software.

Protect data in transit with IP security

Your data can be captured while it's traveling over the network by a hacker with sniffer software .To protect your data when it's in transit, you can use Internet Protocol Security (IPsec)--but both the sending and receiving systems have to support it. Windows 2000 and later Microsoft operating systems have built-in support for IPsec. Applications don't have to be aware of IPsec because it operates at a lower level of the networking model.

Virus protection

Protect your computer against viruses and spyware. These are typically sent through email or your browser. Viruses can cause tons of damage to stored data. They can delete files and provide others access to your computer. Be sure to install a quality anti-virus/anti-spyware program onto your computer.Otherwise you can take online virus removal support service from any third party.

Secure wireless transmissions

Data that you send over a wireless network is even more subject to interception than that sent over an Ethernet network. Hackers don't need physical access to the network or its devices; anyone with a wireless-enabled portable computer and a high gain antenna can capture data and/or get into the network and access data stored there if the wireless access point isn't configured securely.

Use rights management to retain control

If you need to send data to others but are worried about protecting it once it leaves your own system, you can use Windows Rights Management Services (RMS) to control what the recipients are able to do with it. For instance, you can set rights so that the recipient can read the Word document you sent but can't change, copy, or save it. You can prevent recipients from forwarding e-mail messages you send them and you can even set documents or messages to expire on a certain date/time so that the recipient can no longer access them after that time.
All above points are the basic guidelines to safe your data from data loss. To solve technical related problem in your computer then you can reach online technical support service desk of V tech-squad at their Toll Free No +1-877-452-9201.

Tuesday, March 6, 2012

Windows 8 support with metro style user interface

windows 8
With Windows 8 operating system, Microsoft has made some stunning changes when compared to its previous version. One of the major goals of Microsoft with Windows 8 was to make it suitable for touch screen devices. To fulfill this objective, Microsoft has introduced the Metro style user interface in Windows 8 to make it more attractive and compatible with touch screen devices. This article contains information provided by Windows 8 support team regarding its new metro style user interface.

Metro user interface explained in detail by Windows 8 support team

Windows 8 support team explains that the Windows 8 user interface of two different elements, the metro user interface and the traditional user interface. So with these improvements Microsoft has able to provide a stunning looks for its desktop and other components like Internet Explorer and a Copy File dialogue box.

Unlike the traditional Windows interface, the new Metro interface offers much more than visual affect. According to the Windows 8 support team, users can also feel the difference of Metro style interface while using some tools, APIs, languages, UI  etc.

Windows 8 support team explains that Windows 8 is having a no compromise design, which means it works well with old and new. Windows 8 support team also informs that users will get an attractive, quick and fluid metro style interface and a variety of different applications to use.

Windows 8 support team is of the opinion that if you like the metro style user interface so much, then you can choose not to use the ordinary desktop permanently, so that the role of desktop will be cleared.

Extended Taskbar
The taskbar is extended in Windows 8 natively across both monitors. All the pinned and running tasks on the taskbar are displayed on both the monitors and the start button is there on the primary monitor but that’s not it. The secondary monitor features a switcher button in place of the start button, clicking which will swap it with the start button, bringing it to the secondary monitor and taking the switcher to the primary one.
extended taskbar
This can come really handy when you want to be able to control Windows from both monitors, especially in scenarios when you don’t have both displays side by side or even visible at the same angle, like projector displays during presentations.

Extended Wallpaper
For extending the wallpaper, across both your monitors, you will need an image with the right dimensions that can span across both your screens, or it will appear pixelated or stretched. Once you have the image you want as your extended wallpaper, right-click the Desktop and click ‘Customize’. From the themes, select ‘Windows Extended’ under Aero Themes, as shown in the following screenshot.
windows 8
Once you have the theme selected, you can then select your extended wallpaper. Click ‘Desktop Background’ to bring up the wallpaper customization interface. From there, browse to the location where you saved your extended wallpaper if it isn’t already being displayed there. Right-click the wallpaper of your choice and from the menu, select ‘Set for all monitors’ as shown in the screenshot below.

Windows 8 also lets you set different wallpapers for each monitor. Simply follow the above procedure but instead of selecting ‘Set for all monitors’, select the particular monitor you want to apply it on.


Thursday, March 1, 2012

Microsoft unveils Windows 8 for consumer testing

BARCELONA, Spain — Microsoft is for the first time letting consumers try out its upcoming Windows 8 operating system, which it hopes will be used to power a new wave of computer tablets and traditional PCs.
The test “beta” version of the revamped system was introduced at the Mobile World Congress in Barcelona, the planet’s largest cell phone trade show.
windows8
Microsoft Corp. on Wednesday offered it up free for download, along with free applications in a new “Windows Store.”

Windows 8 doesn’t have the traditional “Start” menu and applications are spread across a mosaic of tiles in a design Microsoft calls “Metro.” seen as an attempt by the company as a scramble to preserve its market share. And executives said it powers up on PCs in eight seconds, much faster than the previous version.

The tiles, which resemble road signs, can be navigated with a finger swipe on the screen or with a keyboard and mouse.

Microsoft executives in Barcelona showed off how users can use their fingertips to swipe in and out of applications, and tilt upright computer screens to a flat position so they can be used as two-person gaming boards or big drawing tablets. A slim laptop had a hinge allowing it to be turned inside out so it could be used as a tablet instead.

The test version was downloaded by people from more than 70 countries as Microsoft gave its presentation about Windows 8, but the company didn't immediately disclose the number of downloads. The software can be downloaded at http://windows.microsoft.com/en-US/windows-8/consumer-preview.
Copyright 2012 The Associated Press. All rights reserved. This material may not be published, broadcast, rewritten or redistributed.

Wednesday, February 22, 2012

How to Set Up Email Filters In Gmail and Hotmail

Setting up email filters or organizing your emails into folders is an efficient way to manage your emails. To help you organizing your incoming email messages, Windows Live Hotmail can put them in specified folders automatically.You might want to know how to set up email filters to automatically sort your email into folders for better management.

For example, if you want to have a Facebook filter to separate all your notifications emails from your everyday emails. You could also do this for newsletters that you are subscribed to, emails from family members, or emails related to work. As you can see, there are a lot of advantages for filtering your emails.In this blog, I am going to show you how to set up email filters in Gmail and Hotmail .

Creating Filters in Gmail:

The first thing to point out is that Gmail does not use the tradition “˜folder’ structure. Gmail uses “˜labels’, but they are pretty much the same thing, it just has a different name.If you have existing filter then it will be displayed.
gmail filter settings


Gmail, Google’s web-based email, is one of the most popular email programs on the Internet. The first thing to point out is that Gmail does not use the tradition “˜folder’ structure. Gmail uses ‘labels’. For create the filter in Gmail follow the given steps:

  •  Logon your Gmail account, to setup an email filter, click on settings which are in the top right corner, then click on Filters.
  • To create a filter, click on Create a new filter. Fill the all criteria like… 
       From: Who the email is from. This can be an email address or a phrase in the email address such as   makeuseof. If you include makeuseof in the From box, all emails that are from a MakeUseOf email address will be applied to the filter.

To: You may have email forwarding or POP access set up on your Gmail account so all your work emails get sent to your personal Gmail account. Therefore, if you want to separate your work emails from personal emails, enter your work email address in the To box. All emails you receive that are sent to the email address you specify, the filter will apply.

Subject: If you enter a phrase in the Subject, any emails with that phrase in the subject would be applied.

Has the words: If the contents of the email has the words you specify, the filter will apply.

Doesn’t have: All emails that do not contain the following phrase you specify, the filter will apply.

Has attachment: All emails with a file attached.
Gmail filter criteria

  • Click on the “Test Search” button after entering your filter information. You will want to verify that the emails you were trying to filter show up in the test search. If they do not, you will need to tweak the filter options and perform another test search. After confirming that the emails are filtering properly, click on the “Next Step” button.
 Suppose if you want filter your Facebook email and also apply to the Facebook label .If you don’t  have a Facebook label, make sure you create it when you select the label in the drop down box. Make sure Apply the label is also checked.
Gmail create filter 


Create An Email Filter In Hotmail:

  • Select Options | More options... (or just Options in Windows Live Hotmail classic) from the toolbar.
  • Follow the Automatically sort e-mail into folders link under Customize your mail.
  • Click on New filter button.
  • Select the desired filtering criterion under Which messages are you looking for?.
  • Choose the folder to receive all mail matching your criterion under Where do you want to put these messages?.
  • Click Save. 
Smiley face


Wednesday, February 15, 2012

Great features in Internet Explorer 9


Internet Explorer 9 is series of graphical web browsers developed by Microsoft .IE (Internet explorer) has been losing potential users for a number of years now. In an effort to keep their users they have offered a new internet explorer version 9.IE9 give everything that users want and need in a web browser.
Internet Explorer 9 should be the go-to browser for organizations concerned about protecting computers  from malicious downloads, according to a new study from NSS Labs: Microsoft's browser trounced rivals Chrome, Firefox, and Safari in the security company's more recent malware-blocking tests, a significant win considering that traditional malware remains among the most prevalent threats to users.
Internet Explorer 9 provides the best features for Windows. Here are the top features which is providing by windows internet explorer 9.
It's even faster:
Hardware-accelerated text, video, and graphics speed up performance and make websites perform like programs that are installed on your computer.
Clear appearance:
Internet Explorer 9 gives internet users a cleaner web browsing experience. Tabs, buttons and other items are all moved into one row instead of cluttered all over the screen.
Tracking Protection:
Any other area where IE has taken the privacy-related issue of tracking protection. Most sites request content from third parties, and often these are ad networks that track users' web surfing habits and build up profiles by combining data from many sites that use the same third party.

The Ability to Pin Tabs 

pinning tab
Tab pinning
IE9 offered a tab pinning option. This means if you have a tab that you can visit a lot or need to keep referencing, you can pin it so it doesn’t move down the list. Also included in the tab pinning option is the ability to pull up a row of all tabs so you can see each window and tab in real time and flip back and forth to it.

Unified Address Bar

IE9 that makes it address bar unified – it means address bar is unified box for navigating the site or start a search. When you type the words, it gives you suggestions from your history and bing with inline images.

Redesigned New Tab Page

IE9 giving the facility of new tab page which  is totally redesigned to give a quick access to the sites you visit often and also display that site’s icon, title and a bar to indicate the relevant frequency of visits. You can also reopen the closed tabs or your last browsing session or start a new Private browsing session.

Improved Add-on Management

Add-on management  offer the  Add-on Performance Adviser which gives you an idea about which add-on is slowing down your browsers and allows you to disable or remove it permanently to ensure that your browser always loads up fast and runs fast.

Better Privacy Features

The new tracking protection feature enables you to limit the sites that can track your information when you are online. It means there is a built-in blacklist option than helps you choose certain websites and block them.

HTML5 Support

Google Chrome has supported HTML5 location capabilities since version 5 came out last spring, and Firefox and Opera also support this technology. Finally, Internet Explorer 9 uses the services and supports HTML5. This will allow you to open HTML5 designed websites, video and audio and other HTML5 goodies. IE9 also supports SVG and Canvas graphics.

New Download Manager

tab management
Tab management
Internet explorer 9 ,allows you to view your files that are downloading through your browser. You will find the option “View Downloads” in the options menu at the end of top toolbar. It also notifies when a downloaded file is malicious or contains viruses. It also helps you to pause any of the download and resume it later.

Enhanced Tab Management

Tab Management has been improved tremendously in IE9 as well and now it implements the feature of tab tearing similar to Opera, Chrome, Safari and Firefox. You can easily move tabs between windows by tearing them from one window to another.